Sunday, February 27, 2011

Vintage Inspired

I am by no means a trendy person. Most of the clothes in my closet are from high school, and the majority of them consists of plain colored tops and jeans. I've never paid more than $20 for a pair of shoes, and when it comes to jewelery...let's just say that being a mom has changed my wearing of dangly earrings, necklaces, and bracelets. In fact the only thing that I am really able to accessorize with are hair clips and broaches.

A few weeks ago I felt vintage inspired. I am not a vintage dresser or decorator, but I adore all things old-fashioned. Tulle and lace are so dang cheap (cheaper than normal fabric) and so are buttons, especially if those buttons come from the bargain bin at the craft store. I filled a tiny baggie of awesome buttons for 99 cents. Worth the effort? oh yes.

With all the supplies in place, it took me about half an hour to create these vintage insprired broaches (you can wear them in your hair also).

I love love LOVE anything with lace. This pretty pink stuff was dirt cheap and looks great with a something silver.

This is bridal veil lace, and it costs a pretty penny more but I only bought 1/8 yard and it was $3. I still have plenty left over, too.

These broaches are made from sheer tulle. It is kind of metallic looking, and looks very pretty with multiple layers.


I'm not sure what this tulle is called, but I think it looks like fish-net. Usually this stuff looks awesome when coupled with some silk petals, but I'm still debating whether or not I like it just by itself.

So there you have it. What inspires you?

Wednesday, February 23, 2011

"Tight Wad Crafts": Bedroom Makeover part II

Jonathan and I (and little Talmage) went to Parma for President's Day weekend and had a blast! We did lots of visiting, a little bit of shopping, and TONS of thrift store scavanging. Joann's had some awesome sales and so I was able to add to my sewing shelf a bit :) When we got home I was chomping at the bit to get started on some more projects for our bedroom. It's just so addictive...if I go three days without making something I go nuts! So anyways...here is what I did.

***warning! There are LOTS of pictures in this post. If you don't care for them, then don't continue reading. You won't hurt my feelings :)


Yes, more pillows. What can I say? They are easy and I think they add a lot to the room :)

MONOGRAMMED PILLOW:
Sometimes, when I'm lying in bed at night trying to fall asleep, I think of new projects. A random thought will pop into my head, like say, "Wouldn't it be cute to have our initials on a pillow?" And that is how this came to be. All you have to do for the letters is print them out from your computer in a font you like, trace them onto felt, pin the felt letters to the pillowcase, and sew a small zigzag stitch around the edges. So simple! ah, I love drowsy ideas.


BEADAZZLED CANDLE:
I found this wooden candlestick at the thrift store for a buck. On the candle is a stretchy stringed, super sparkly bracelet and wire charm. Ignore the seemingly pink wall. It is white.

FLOWER ACCESSORIES HOLDER:

I have so many of these darn things that I figured it would be a good idea to have someplace to put them all. You can make so many different versions of this, but for mine I bought a frame from the D.I., spray painted it (is it not clear that spray paint is my best friend?), covered the inserts with fabric, and stuck some silk flowers and lace on it. Wallah, a place to put my trinkets. It looks super girly on the wall but I don't really have a choice here :D


FRAMED BURLAP BLOOM:

I won't expand on this...basically I put the homemade burlap bloom in the spray painted frame. If you'd like to know how to make these blooms, here it is:
1.cut out a circle of felt that is one third of the size you want the bloom to be.
2.cut out 9 circles, all the same size. You will be folding these twice, so cut them the size you'd like the petals to be after folded.
3.fold 4 circles in half, then in half again, and hot glue -equally spaced- to the felt circle. Repeat with the next four circles, spacing them in between the first four.
4.fold the last circle just the same, and hot glue the pointy end to the middle of the bloom.


I didn't make this, but I did slap on some spray paint. Just thought I'd share :)

I didn't make this either, BUT I still think its neat. It is a drawing of me when I was a pregnant model for the art students. A well-known artist and art professor happened to walk in on a day I was modeling, and he let me keep this (which he was going to throw away). I think its... tender :)
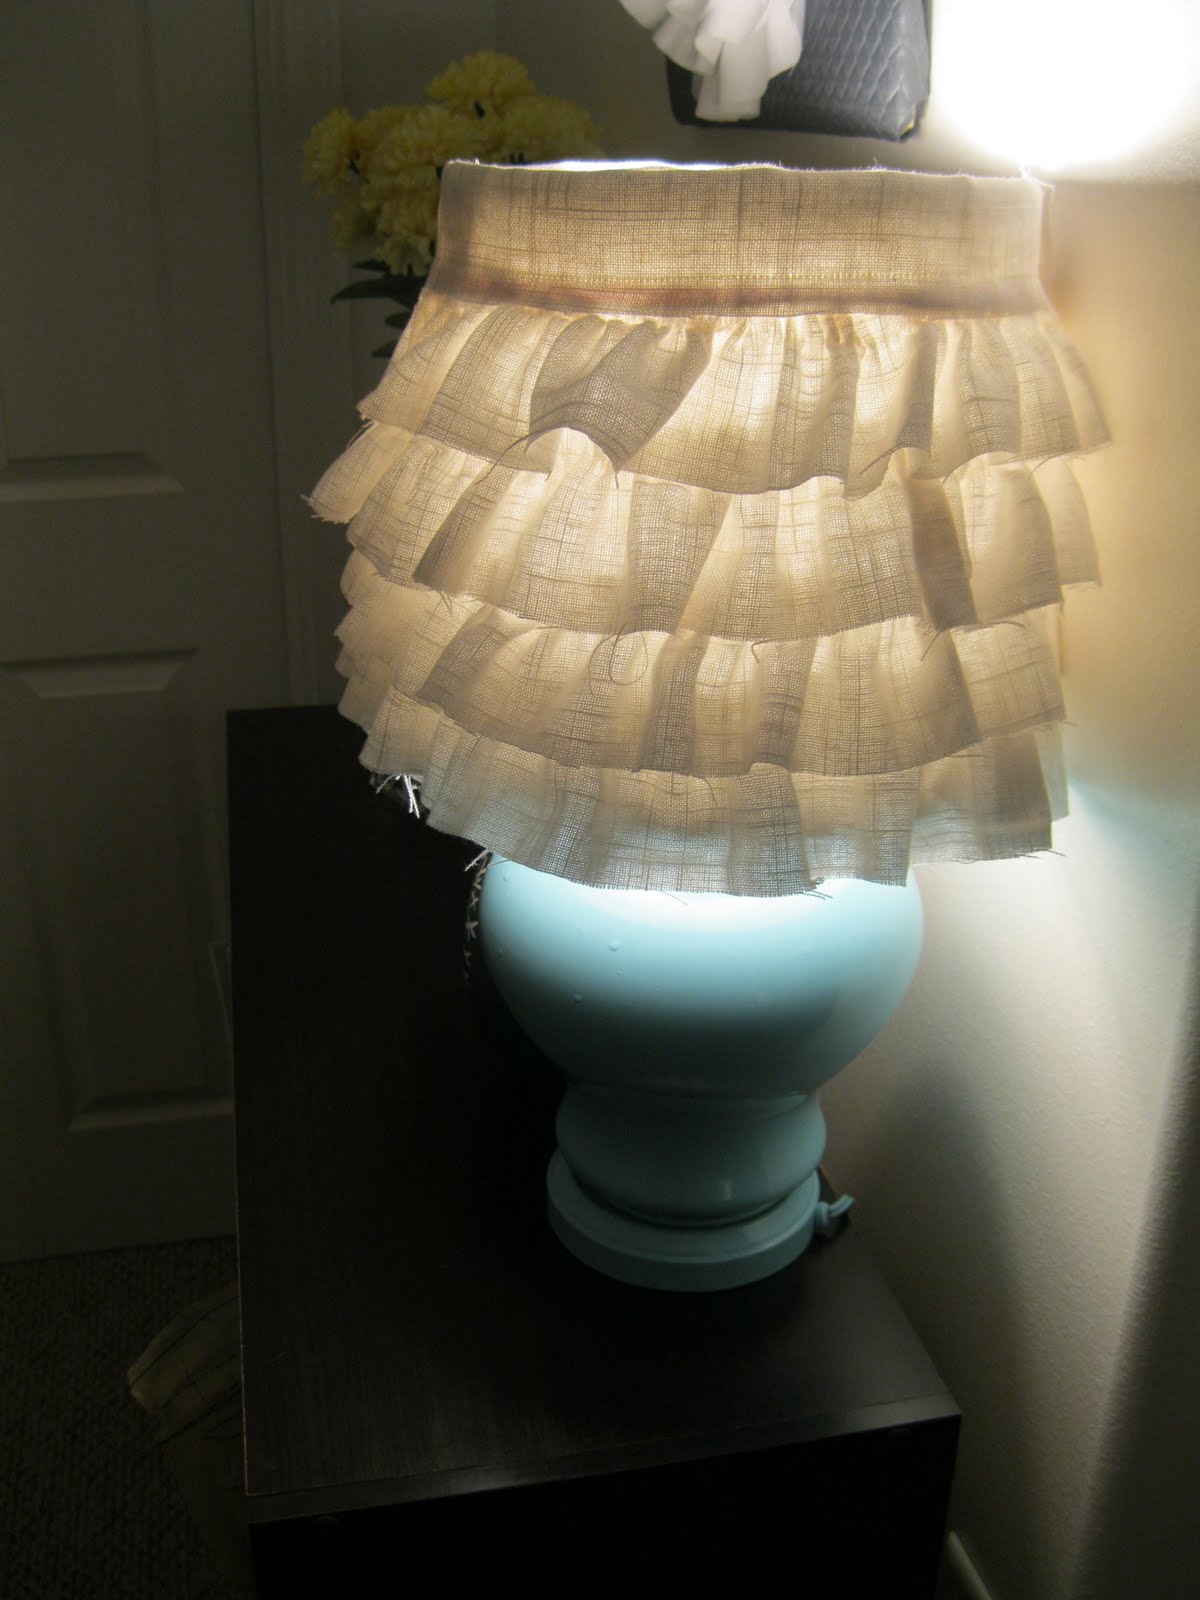
LAVISH LAMPS:
These are by far my favorite two things in our bedroom. The lamps were so so cheap, and the shades were $8 a piece. As the lamps that I'd looked at before were $30-$50, I would happily pay the former.

I used this tutorial for the first lamp and followed it exactly. The one thing I did different was use hopsack linen instead of burlap, because I couldn't find burlap in white ANYWHERE. It worked just as good, and was probably easier to work with.

For the second lamp, I sort of just made something up. I wanted them to be a little different from each other (as the lamp bases are a bit different). So I just cut out strips of the same fabric, basted them, ruffled them, wrapped them around the lamp and put a flat strip at the top, seam facing in.

They look even more fabulous when turned on!


And there you have it! The key to a complete makeover are the little (and inexpensive) things :)


happy crafting!
edit*** it was asked where I got my lamp bases. I found them both at two different thrift stores for $2-$3 a piece. They are called ginger jar lamps, and they are pretty old-fashioned- which is why they are found at thrift stores! :)

Thursday, February 17, 2011

"Tight Wad Crafts": Bedroom Makeover

My all-time favorite craft blog out there is Ashley's Make It & Love It from Georgia. She is full of amazing ideas and I have to be careful every time I read one of her posts because I am almost ALWAYS inspired. Thanks to her, I have been able to give our bedroom a little flare( and at such a low cost!) I used these tutorials of hers:

Hanging Flower Garden

Flower Wall Hanging
Ruffled Pillow

The results?

I am loving it! I got inspired a while ago with grey and yellow. Subtle yet cheery :) And so fun to decorate with...I am thinking about adding some light blue in there. More pics to come as it is a work in progress!

Anyway, about Ashley's tutorials. They are incredible easy to follow, and you don't need much sewing skills for any of it (believe me, I am still such an beginner at the whole sewing thing).

The flower garden was by far my favorite. Every day I look at it and think- "I made that? cool!"


The flower wall hanging works by a similar concept. The tutorial says to use an art canvas or to make your own hanging, but I am broke remember? So I improvised and used our Cup of Noddles box. I know- so tacky clever :)


Girly much? Maybe. Jonathan is getting skeptical, but hopefully we can find a way to add in some of his masculinity ;)

I desperately needed some decorative pillows for our new bedding because they are like $40 a piece. I found almost 3 yards of this grey quilted fabric at Joanns, which is liqiudating and changing locations, for $2! Amazing. Then I stuck some rosettes on it and wallah!

So the next project was a fun ruffly pillow! Jonathan helped me make this one. I taught him to make a basting stitch on the sewing machine and off we went like a madman! I was so proud :)

I discovered a little trick while making this pillow...it REALLY helps if you pull the fabric in opposite direction of the seam as you are sewing, so that instead of looking like this

it will look like this! :)

I really need to stop making pillows...it is so addictive.

I hope some of you can enjoy these tutorials! They sure are easy and affordable! Happy decorating!

Monday, February 14, 2011

Love Day

I promised to myself and to Jonathan this year we wouldn't do anything for Valentine's Day...mostly because of our low funds. Also, I've never been a huge fan of this holiday growing up- it seemed a little froofy :) But a few days ago, I realized that for me to pass up this once-a-year holiday that allows me to go all out in expressing my gratitude and love for my sweet husband is sort of silly. So, I came up with a last minute gift idea.

First I did what I most enjoy- writing poetry. It was a great way for me to express just how I feel :)

I love the old-fashioned script...


I also found these "love coupons" on the Tatertots & Jello blog. Normally I would find this kind of thing cheesy, but it was helpful to a gal with little moneys :)


Some of them were blank, so that I could write stuff in.

Yes, that does say "one free video game" because I broke down and splurged just a little and got him "Force Unleashed". I wrote "of my choice' just to throw him off :)

And lastly to top it off I covered the bed and bedroom floor in exactly 125 Reese's candy hearts, plus a giant one on his pillow!

All I can say is that it felt good to show Jonathan how much I love, respect, and cherish him. He is my best friend and I was swept off my feet from the first time I laid eyes on him as he came off the plane from his mission. I could not ask for a better man!

If anyone is wondering, Jonathan got me a fabulous smelling candle from Bath and Body Works, along with a most touching card and my favorite chocolate truffles. Did I mention that I love him so much?!?!?


To end this blissful day, we ate a delicious meal of heart shaped pasta topped with shrimp and pesto! yum. And now I get to watch the Bachelor. woohoo!

Happy Valentines Day everyone! Please share your own love days on your blogs!

Sunday, February 13, 2011

Reasons why I'm happy!

1. Mubarak has stepped down at last! What a momentous time of history that we can witness! (at least through the news channel) I know that the Egyptians have waited for this through much long-suffering. I had a great big smile on my face all day yesterday.

2. Valentine's Day. Of course, right? What married person doesn't love this holiday?! More details to come :)

3. Blu-ray. I know this sounds stupid. But lately I've really been lovin this high-def stuff on our 1080p tv. Who knew movie-watching could be so awesome? We also just joined the Disney Movie Club and received our first 7 Disney blu-rays in the mail :) looove it.

4. Good friends. We have some really good friends here in the burg. I am so thankful for this...I love my ward so much! More specifically I LOVE our Relief Society girls! There's a bit of every kind of personality type :)

5. I have the cutest little boy ever.

Goodnight and happy thoughts!

Thursday, February 10, 2011

"Tight Wad Crafts": Monogram Wreathe

Since I post a lot about stuff I make, I've decided to title those posts accordingly. Now you'll know before you read if it is just me rambling or me sharing a fun craft. I get my ideas from other fellow crafty bloggers---because there are like a million out there and I spend way too much time on blogger, stalking their genius :) The main idea here is that I have a very tight budget for things like this, and so I try to seek out the most inexpensive yet darling creations that anyone can do. (I would not call *myself* a tight wad, in fact most of the time I am anything BUT. still, you get the idea.)

I've had two addictions this week.
1.Gathering fabric, which I'll expand on in a later post.
2.Making fabric rosettes. I wasn't sure what I was doing, but they turned out remarkably decent. There are only so many things you can stick a rosette onto, and I didn't want to go *too girly all over our apartment. So, I made a wreathe.


I found the wreathe at the thrift store for $3. If you go to the outdoor section they usually have them lying everywhere- still you may have to dig a little. For the last name inital I mod-podged scrapbook paper onto a wooden letter from the craft store. so easy!


And the fabric rosettes are incredibly simple to make. There are a few differing tutorials out there, but I found this one to be the most effortless. You can wind them tight or loose. I like mine a little looser and vintage-looking (if you like the vintage feel be sure to TEAR the fabric instead of cut...which I didn't do this time but they turn out better that way!)


And wallah! A great big personalized greeting to welcome you to your humble abode.
Happy crafting :)

Monday, February 7, 2011

Ups and Downs

Here in the Dennett household things are going...well, a little bit in every direction. We have our ups and downs.

UPs:
*Jonathan has started p90x, and he is on the fifth day! I am so proud of him. It is way too intense for me...and the average human being :/
*at the same time I have started Slim in 6 again (the first time I only made it to one week). I really want to stay with it this time, and it really helps that Jonathan is working out daily too. We encourage and remind each other about our commitment to stay fit.
*we have started eating better. I'm not talking out life changes, but just the little things. Like, not eating late at night, having smaller portions and more healthy snacks in between, limiting sugar intake, and including more vegetables in our diet. I already feel like I have more energy and we both sleep better at night.
*we are nearly done with our taxes and have made some big plans for our tax returns. I feel so blessed to have aunt Mandy...she is Jonathan's aunt and she used to be an accountant. She does our taxes every year with her accountant credentials and lets us know what our return will be. She knows how to get us the most money :)
*just having little T is an up in itself. He is already standing on his own and can take up to 5 steps! I can't even believe how he balances those proportions. We love him so much and every day there is something new to smile or laugh about!
*Jonathan has a job! He didn't even need to apply. One of his old professors, also a head of the Recreation Management department, called and asked if he could be his T.A. He gladly accepted and sets aside a few hours every day to work on that.

DOWNs:
*Talmage is teething. Its impossible to predict which nights we will get sleep. Poor little guy.
*the little guy and I both have colds. never fun!
*There is so much snow outside its almost depressing. I've never been a snow fan, so its hard for me to turn this into a good thing. We did buy snow pants for Talmage but as we are still sick, that will have to wait.

Remember that sewing class I mentioned? Well the people at Registrations let me in on a little secret. I am not allowed to audit a class as a non-student. Most teachers aren't aware of this, apparently. Sooo...that's out. I did learn some useful things though and I will continue to sew little projects that come along. The only thing I accomplished in the class was this pillowcase. It matches a baby blanket of Talmage's that his aunt Layla made. I really love this fabric- very boyish with the dinosaurs and bugs :)


Also, instead of pilates some girls from the ward persuaded me into going to Zumba. LOVE it. I never knew I could dance like that for an hour straight and still get an awesome workout! I plan on going every week, that is if I'm not still sore from my other stuff, and if I'm not sick :/

That is our current state in a nutshell. Luckily the list of "Ups" is longer :)